Recently, many friends have asked about the installation of elevator wireless monitoring. Today we will come to understand. Elevator is an important closed public area of ​​the building and a key channel for access to the upper and lower. Elevator video surveillance plays an important role in the security of the entire area and is an indispensable part. Elevator video surveillance can grasp the situation inside the elevator car in real time to ensure passenger safety.

Elevator surveillance video transmission can be divided into wired and wireless. The cable transmission adopts the professional elevator accompanying cable, and the general accompanying cable is seriously worn out, and the service life is between six months and one year. The high-rise elevator cables have higher requirements against tensile strength and electrical parameters, preventing the impedance mismatch caused by tensile deformation of the cable load self-weight, and the signal-to-noise ratio attenuation of the video signal causes interference. It is difficult to replace the new accompanying cable again, the construction period is long, and the cost of replacing the accompanying cable is also high. The other is wireless transmission. The wireless transmission adopts the point-to-point method. A transmission point is installed on the car, and a receiving point is installed at the end of the elevator shaft. The data can be freely transmitted while the elevator car is moving. The wireless transmission equipment is simple to install and has a life span of at least 3 years, and the bandwidth fully satisfies the high-definition surveillance video transmission.
How to deploy
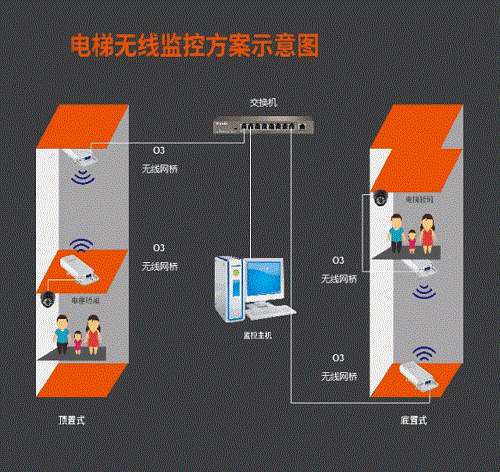
There are two installation methods for elevator video surveillance video wireless transmission. Top-mounted and bottom-mounted, as shown below:

The overhead deployment is suitable for the monitoring center at the top of the building, and is generally deployed in a bottom-mounted manner.
How to set up a bridge
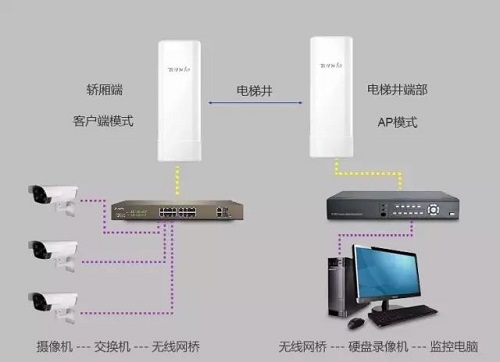
The bridge at the car end needs to be set to the station mode. In this mode, the bridge is equivalent to a network card. Convert the video data of the webcam from an electrical signal to a wireless signal.

The bridge at the end of the elevator shaft is set to the AP mode. In this mode, the bridge and the NVR are directly connected through the network cable, and the received wireless signal is directly converted into a wired signal and transmitted to the NVR. Summarized in one sentence: the bridge near the camera is set to client mode, and the bridge near the NVR is set to AP mode. The bridges need to be paired beforehand before installation in the elevator shaft.
Set AP mode
The bridge works in AP mode by default. You need to connect the computer directly to the bridge and manually set a fixed IP address for the network card. The default management address of Tenda Bridge is 192.168.2.1, so we can configure the IP of the same network segment for the computer, such as 192.168.2.20. After setting the SSID and password of the AP-side bridge, record the parameters and save them.
Set client mode
After the bridge at the car enters the management interface, select the client mode, then scan the superior wireless signal, select the SSID of the AP-side bridge, and enter the same password. Click Next and change the management address of the bridge to the same network segment and different IP from the AP and the computer network card. Except for the previously mentioned 192.168.2.1 and 192.168.2.20, other network segments can be used, such as 192.168. 2.30.
Unicom testing
To ensure that the bridge has been successfully paired, you need to do a connectivity test before installing it into the elevator shaft. The steps are as follows:
1 computer connected to the client bridge;
2 Press win+R on the keyboard, enter cmd and press Enter to run the cmd program.
3 Enter ping 192.168.2.1 (AP bridge address).
If the ping is successful, the bridge is successfully paired and installed directly into the elevator shaft. If the ping fails, the bridge is not successfully paired. It is necessary to further check whether the settings are correct.
Installation wiring and debugging
Wiring is relatively simple, just complete the connection and power supply between the camera and the car bridge, the elevator shaft bridge and the NVR. Due to the PoE power supply, it is strongly recommended to use a Category 5 (Cat5e) or higher network cable.
There is generally no strong interference signal in the elevator shaft. In case of interference, the channel can be adjusted to avoid interference. The direct selection of 5G bridge transmission is becoming more and more mainstream.

Final rendering
common problem
1 Q: After the bridge is paired, the NVR address can be pinged from the client, which is the result of the image.
Answer: Only the network camera that conforms to the TCP/IP protocol can transmit the bridge. If you use the proprietary protocol, you can try another webcam.
2 Q: An elevator shaft has two side-by-side elevators. How many bridges are needed?
A: At least three units are required. One is set to AP mode and placed in the center of the bottom of the elevator shaft. The other two are set to the client mode and installed to the bottom of the car.
3 Q: I want to save a switch. Can I connect another bridge with the LAN port of the bridge?
A: Yes, but don't string too many levels.
EVA Sheet
EVA Sheet is the most basic material for many EVA foam product. It is widely used in toys, marine, automotive, sports, construction, education and etc.
We can provide different sizes, thickness, hardness and density for the EVA Foam Sheet to meet the different requirements from customers. And with our experience in EVA foam industry, we will also provide a professional EVA foam product solution to customers.


